How To Use Website as Custom Server
Note: This guide is for Steam users only. It is not possible for console players to use this to connect to the site to track and update personal bests automatically. If you would still like your times updated, please DM me @abigdweeb on discord/twitter.
Step 1: Download the Mod File
This is the only file you will need for this mod to work! Once it's in the right place, you won't have to think about it again. Big thank you to both Adam and Ruby for working on and spending so much time on this project. ❤
Warning: Both Chrome and Windows don't like downloaded DLL files. You'll need to make sure you allow it for the download to complete. The button links straight to the Github for the precompiled download.
Step 2: Locate Your Splitgate Installation
1 Open Steam and go to your Library
2 Right-click on Splitgate and select Manage → Browse local files
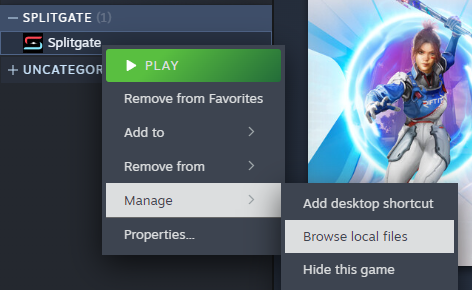
Right-click Splitgate and select "Browse local files"
Step 3: Install the File to Correct Directory
3 This will open a File Explorer window where Splitgate was installed. Navigate to:
PortalWars → Binaries → Win64
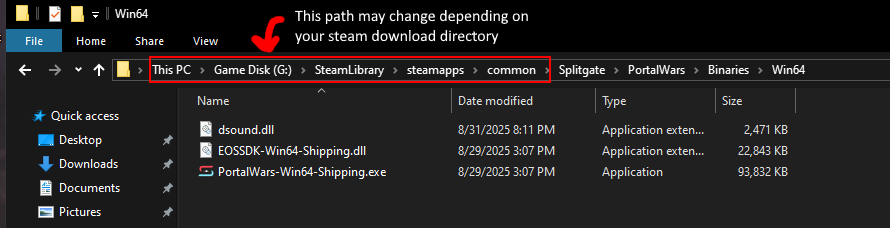
Navigate to the Win64 folder where PortalWars-Win64-Shipping.exe is located
4 Place the downloaded
dsound.dll file in this directory next to the Shipping.exe
Step 4: Launch the Game
5 Launch Splitgate as you normally would through Steam. Once launched, press F1 to open the mod menu.
Note: When launching the game, you will see a command prompt window open up. Don't be scared! This is just debug logging. You can minimize or ignore it, however, closing it will also close the game, so you must leave it open while the game is running.